


Prospect Grading is a Pardot feature that represents how closely a prospect fits your ideal customer profile. Each prospect is assigned a letter (A-F) that is calculated by matching their data with your defined criteria. Essential for smarter lead qualification, grading can have a big impact across the organisation when setup and leveraged properly. This four-part series will walk you through how to set up Pardot grading gradually, so you can navigate the different moving parts involved in grading.
In Part 1 and Part 2, we learn about what grading is (and how it’s different to scoring) and successfully mapped out our grading framework ready to implement into Pardot. Now it’s time to start constructing!
What are Grading Profiles?
Profiles are the glue that holds grading together, a container to place all your criteria into.
Pardot grading profiles are not related to Salesforce profiles, in fact, they are entirely different concepts!
To find your profiles – in the Lightning App, go to: Prospects → Segmentation → Profiles
(Pardot Classic, go to: Marketing → Segmentation → Profiles)
Every Pardot account comes with the ‘Default’ profile, that is automatically assigned to any prospects created – if you’ve ever created a prospect manually, you will know that you had to select this as a required field.
Two facts are key to know:
- Each prospect has one profile.
- Each profile is made up of multiple criteria and their grade adjustment.
Remember our matrix from Part 2, and the ‘sense checking’ exercise?
Copy it, and clear all the values in the cells.

Then, for any:
- ‘strong match’ enter ‘1’
- ‘good match’ enter ‘2/3’
- ‘weak match’ enter ‘1/3’
- ‘no match’ enter ‘not known’
(Ps. if you only used the simple matrix in Part 2, then only use ‘strong match’ and ‘no match’ values)

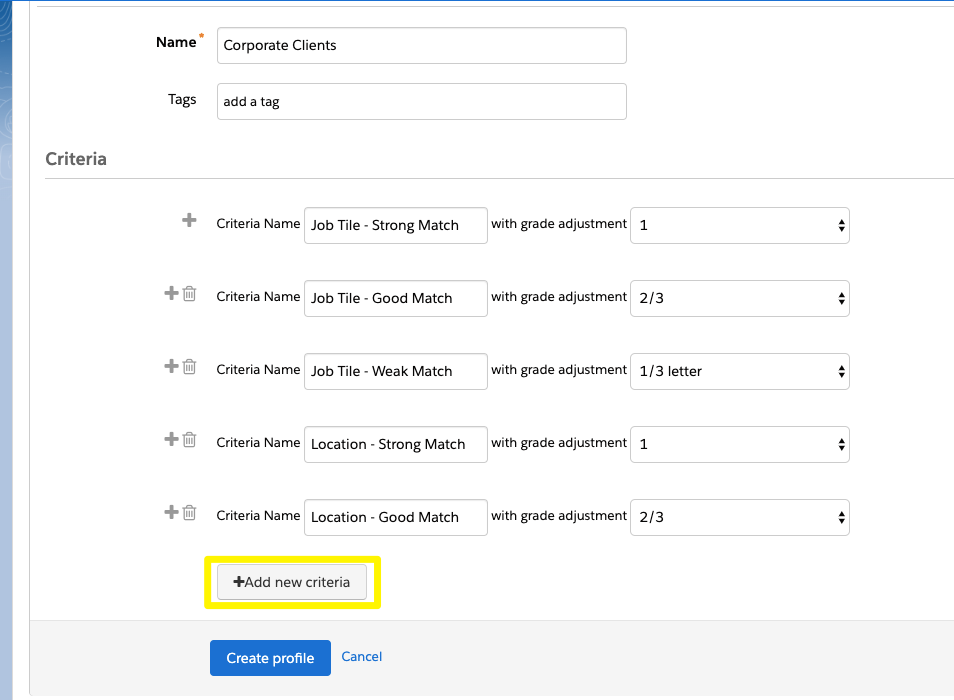
Create a new profile in Pardot, and name it.
In the ‘criteria’ section, there are two boxes: ‘Criteria Name’ and ‘with grade adjustment’. Do the following for each box in your grading criteria matrix:
- Criteria name = name of criteria + match strength; eg. Job Tile – Strong Match
with grade adjustment = select number in the box from the dropdown; eg. 1
Repeat this for all the boxes you need by clicking ‘+Add new criteria’. Ignore the ‘No Match’ column. You will end up with something like this:
Assigning Prospects to the Profile
I mentioned the ‘Default’ profile earlier, the grading profile that comes with every Pardot account and is what all prospects will be assigned to – so your job now is to segment and reassign any prospects who should belong to your newly created profile. There are a number of ways to do this:
- Manually, by editing the individual prospect’s record (I recommend this initially, for testing).
- Automatically, by using automation rules to ‘Assign Prospect to Profile’ based on certain criteria.
Hold tight, because Part 4 will be a deeper dive into the automation that will power your grading profiles to start calculating a prospect’s correct grade. Keep an eye out for the post, coming soon!


