Article
Data Cloud Breaks $1B ARR Milestone in Q1 FY26: What...


With Salesforce users’ automation requests on the rise, admins are increasingly turning to Flows to enhance the user experience and make processes more efficient. Among the various Flow types, Screen Flows stand out for their interactive capabilities, enabling admins to collect data directly from users through guided screens.
Whether it’s assisting with onboarding tasks, providing step-by-step guidance, or simplifying complex workflows, Screen Flows have the potential to boost productivity with their capabilities. In this article, we’ll focus on a specific use case that involves uploading multiple files using a screen flow.
If you’ve ever worked with automation in Salesforce, you might already know about tools like Process Builder and Workflow Rules, both of which focus on backend automations triggered by changes to data. Among the common flow types, I can say Screen Flows are the ones that don’t have a direct counterpart in Process Builder or Workflow Rules, as they offer something different – an interactive, front-end experience designed to guide users through tasks step-by-step.
Screen Flows are flows that collect data directly from users through a series of screens or pages. Unlike other flows that run automatically in the background, Screen Flows are there to encourage user interaction. This makes them ideal for processes like:
With Screen Flows, Salesforce admins can create intuitive, user-friendly experiences without needing custom development. And since we’re working in Flow Builder here, they also allow for advanced logic within the flow, like decision elements or formulas, to adapt the user experience based on the data being entered.
In a Screen Flow, each screen can serve as a step in guiding users through a specific process. Since they are highly customizable, they often include various components and settings to ensure the flow collects or displays the necessary information effectively.
Here are the key components you’ll find on a screen:
As usual, before diving in, make sure you have the following:
For this walkthrough, let’s tackle the following use case:
TechSmart Inc. wants to simplify how employees submit reimbursement requests for work-related expenses. Currently, employees must first create a request in Salesforce and then attach images of receipts after. When employees forget to attach the receipts, it often leads to missing files, delays in processing, and extra back-and-forth with managers.
To improve this process, the admin would like to create a Screen Flow that employees can access directly from the home page in Salesforce. On the screen, users should be able to:
Once submitted, the flow should then create a Reimbursement Request record (custom object) with the attached receipts already linked.
This flow should help remove the extra step of manually adding attachments later, ensuring that all required files are included at the time of submission, leading to faster approvals and fewer follow-ups.
With screen flows, I like to imagine what the initial screen should look like or collect. I break this down by figuring out what information needs to be collected vs. what can be automatically created by the Flow. In this scenario, take note of what’s in a simple Reimbursement Request record:

Each Reimbursement Request record also has the Files related list, which houses images of receipts related to the expense.
To begin, navigate to Setup and type “Flow” in the quick find box. When you see “Flows” in the results, click on it to view all flows in your org.

Then, hit “New Flow” on the upper right. This should open the Flow Builder on a new tab, with a prompt for you to choose between starting from scratch or using a template. Select “Start From Scratch”.

The next prompt should ask for your preferred Flow type, in which we select Screen Flow. Click Create on the lower right. The flow starts simple, like this:

Click the plus sign below the Start element and select Screen. Give your screen a label, API name, and description.
Initially, we’re given two parts: the header and footer. I would like to make this screen entirely my own and customize everything displayed, so I’m hiding the header by going into Configure Header and deselecting Show Header.
For the footer, there is no need to remove the “Pause” and “Previous” buttons, as this is just the first screen! You’ll see them as we configure it, but they won’t be there when the actual flow is executed. Your screen should now look like this:

Let’s proceed with making our own header by searching for Display Text in the component bar on the left. Drag it onto your screen and give it an API name.
Since this is for creating a reimbursement request, I would like the header to say “New Reimbursement Request”. Type this in the text editor and customize it according to your preferences. Since this serves as the title of the screen, I am centering the text, formatting it in boldface, and increasing the font size.
The screen shows a live preview so you can adjust accordingly. Here’s how mine looks so far:

On to the exciting part: adding fields for user input. Earlier during our flow planning, we listed down what’s in a Reimbursement Request record. Let’s identify which of those fields need user input, and which ones we’d like to be automatically filled out:
From the list above, I’ve crossed out the fields that we expect the flow to automatically fill out. This means that the unchecked ones would need user input and would have to be on our initial screen.
Let’s start with the first field: Expense Type. This is a custom picklist field, so search for “picklist” in the component bar on the left, then drag it under your lookup. I’m naming this “Expense Type”, then pressing Tab so it automatically populates the API Name. Tick the “Required” checkbox to ensure that users cannot create a reimbursement request without this information. Under “Configure Choices”, keep the fields as is and move on to “Choice”. Here is where we’ll configure a new choice resource.
Since we want the choices in this field to be the same as the choices in the picklist in our reimbursement request, select Picklist Choice Set as the resource type. Give it an API Name and description, then select the object where Expense Type is. Choose Picklist as the Data Type, and the Expense Type field’s API name under “Field”. I’m keeping the sort order as it is.

Then, click Done.

Two more fields to go! Moving on, let’s do the Expense Date next. This is a custom Date field, so search for “date” in the component bar on the left, then drag it under Expense Type. I’m naming this “Expense Date”, then pressing Tab so it automatically populates the API Name again. Tick the “Required” checkbox, and keep the rest as they are.

Last is the Amount field. This is a custom Currency field, so like the others above, search for “currency” in the component bar on the left, then drag it under Expense Date. I’m naming this “Expense Amount”, then pressing Tab so it automatically populates the API Name.
Tick the “Required” checkbox as usual, and keep the rest as they are, except the Decimal Places. I’m setting it to 2, same as the actual Amount field on the Reimbursement Request object.

Now that we’re done with the fields requiring user input, it’s time to move on to the main purpose of this Flow: file uploads.
Search for “file” on the component bar on the left, and drag the File Upload component below Expense Amount. Give it an API Name and Label (in this case, I would like it to display “Attach Receipts”). Under “Allow Multiple Files”, set to {!$GlobalConstant.True} to signify that the user can attach multiple receipts. Scroll down to “Advanced” and tick “Manually Assign Variables”.
Before we move on, let’s discuss how file attachments are in Salesforce.
The file attachments or documents themselves are represented by ContentDocument. When a file is attached to an object, the link between them is represented by ContentDocumentLink. This has two fields: ContentDocumentId, which has the ID of the attachment, and LinkedEntityId, which is the ID of the linked object (Reimbursement Request in this scenario).
If it sounds familiar, you can think of ContentDocumentLink as the junction object between your attachment (ContentDocument) and the object it’s attached to.
Going back to the Advanced section where we left off, you’ll find Content Document IDs. Click it and select “+ New Resource” so we can make a placeholder or variable that will hold your attachments’ IDs. Choose Variable as the Resource Type and give it an API Name + description. Data Type is Text, so tick “Allow multiple values (collection)” as this variable should be able to store the ID of multiple files.

Click Done to create the collection variable and select it under Content Document IDs.

Then, hit Done to finalize your screen element! Here’s how your flow should look so far:

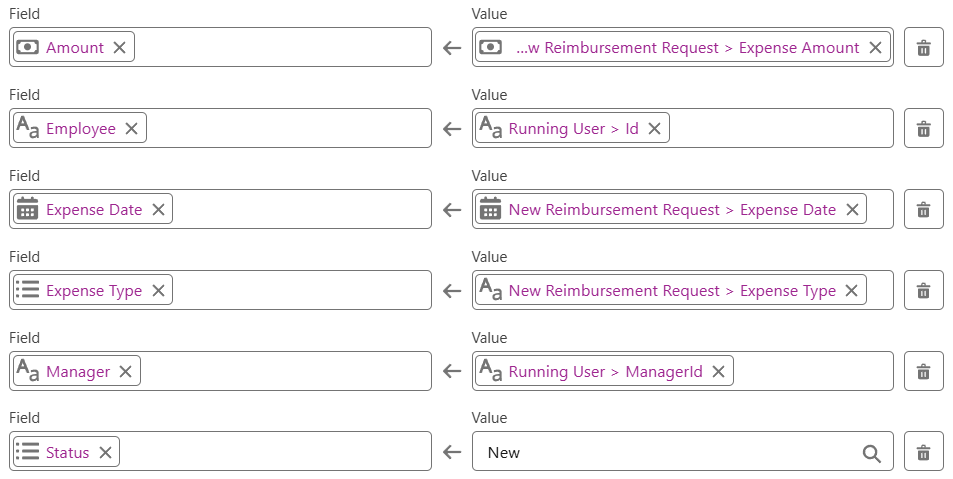
We now have the screen that collects user input, so let’s move on to the element that creates the Reimbursement Request. Click the plus sign under your screen element and select Create Records.
Give it a label, API Name, and description. Under “How to set record field values”, select “Manually”. Pick Reimbursement Request as the object under “Create a Record of This Object”, and map the user input fields we gathered from our screen: Expense Type, Expense Date, and Expense Amount.

For the values, make sure to always select your screen element first and then the value you’d like to map to the field. This signifies that the content of the field will come from the user’s input on the previous screen.
Looking back at our initial checklist, we have the following fields left to be filled out automatically:
Since the Reimbursement Request Name is an auto-number field, we know that this will automatically have content as soon as a record is created – there’s no need for the flow to dictate that. Then, for picklist field Status, let’s configure the flow to set every created record as New.

Fill out the Employee field and make sure to add it as the current user.

As for the Manager, we know that this should automatically be populated based on the current user. Every user has a manager dictated by the standard Manager field in Salesforce, so you can reference that field through the running user.
Here’s everything in our Create Records element so far:
We have an Expense Date field, and we know that when making a reimbursement request, the expense date must always be today or in the past. Any attempt to input a future date should not be allowed (you can’t reimburse a purchase you haven’t made yet!). To ensure this, let’s make sure our flow validates the input on the Expense Date field to ensure it’s always set to a date in the past.
Go back to your screen element and select the Expense Date component. On the right sidebar, scroll down to Validate Input and add a sample error message.

Then, set your formula.

When writing the formula, keep in mind that the logic does not work the same way as in writing Validation Rule formulas. If in a validation rule formula, we write this as TODAY() < Expense_Date__c, which means the error should come up when the formula yields TRUE, it’s the other way around for Validate Input in screen components. The error comes up when the formula yields FALSE, which is why our formula is written as TODAY() > {!Expense_Date}.
Flows are not immune to errors, but bumping into one can be frustrating, as the error message is quite vague – typically displaying as “An unhandled fault has occurred in this flow” without any further context.
To improve the user experience, let’s set up a fault path immediately after the Create Records element. This fault path directs users to an error screen that displays a better error message should the flow fail for whatever reason.
Let’s start by clicking the Create Records element in your flow and selecting “Add fault path.”

Under “Fault”, click the plus sign and add a Screen element. Here’s where we create the error screen. Give it a label, API Name, and Description. On the left side, search for and drag the Display Text component onto your screen. Give it an API Name and work on the error message.
In the rich text area section, insert the resource {!$Flow.FaultMessage}. You can find this by searching “Flow” and selecting FaultMessage from within $Flow. This calls out the error triggered by the current flow.
If you’d like, you can also add a custom message for the user, like “Oops! Something went wrong while processing your request,” or something more specific. Here’s what I went with:

Hide the Pause button from the footer and click Done.
I understand that we haven’t dealt with the file uploads yet. Being the paranoid admin that I am, I would love to do a midway save and test whether everything I’ve done so far actually works. After all, the file upload is all we have left to work on – the current state of our flow should theoretically be able to display the screen, collect user input, and create the record with no issues.
Hit Save on the upper right and give your flow a label, API Name, and description. Once that’s done, the flow is saved, but still inactive.
Let’s now test how the Flow works. Usually, it’s best practice to do debugging within Flow Builder for this part, so let’s do that. Click Debug on the upper right of the page. A new tab should appear with options for debugging. Our inputs will be determined by the screen element, so keep the selected parts as is and click Run.

The first part should be the screen element we configured in the flow. Confirm that all the fields are displaying options as expected, and fill them out. Since we haven’t set up the file upload part yet, there is no need to attempt attaching files while testing.

Click Next, and Debug should inform you that the transaction is done.

It’s time to check if there were any errors! The right side of your screen shows the Debug Details, where you can review each step the flow took, the data it collected, and whether any elements encountered issues. You can review the Create Records element from here and check whether there are any null values or if the flow managed to assign the correct values for each field.
The users will show up as IDs, so review them and check whether the Employee and Manager fields actually display the appropriate people.

No errors, and IDs are accurate. Looking good so far!
Wait, we set up input validation and created a fault path too! Let’s test what the error looks like. On my next testing round, I clicked Change Inputs and purposely added an Expense Date in the future to trigger my validate input error. Here’s the error that appeared as soon as I clicked out of the Expense Date field:

As for testing out the fault path, I temporarily removed the Validate Input configuration we did above, saved it as a new version, and did the debug again.
Since I have a validation rule set up on this object beforehand, putting a future date should still trigger an error, even without validating the input in this case. Here’s what it looks like:

That’s our error right there in boldface, along with added detailed context at the bottom, showing that it hit a validation rule. The same error should appear in case anything else goes wrong with the flow, it’s just the context that changes.
Debug is indeed great for testing out how your flow works without having to activate it and play around with actual records. With the recent Summer ’25 release, debug is set to be even more powerful and user-friendly with the new and improved Debug Panel.
Time to go back to our flow and configure the file upload! Go back to your flow (the version with the Validate Input) in Flow Builder.
Before we proceed to add the Transform element, we need to understand what’s needed and how attachments work.
Our screen allows the user to attach multiple files. We know that after the screen element, our flow has a collection variable that stores the uploaded files’ content document IDs. We need an element that identifies the Content Document records in the collection variable.
Click the plus sign below your Create Records element and select “Get Records”. Give it the usual label, API Name, and description, and select Content Document as your object.
Under “Filter Content Document Records”, filter it so that the Ids are those included in your ContentDocumentIDs collection variable.

Under “Sort Content Document Records”, keep it to Not Sorted, and for “How Many Records to Store”, select All Records.
Next, click the plus sign below your Get Records element and select “Transform”. Give it a Label, API Name, and description, and we’ll proceed to map our data.

We know that in order to connect our Reimbursement Request record and each file (ContentDocument), we would need a ContentDocumentLink. Each ContentDocumentLink would need the following:
This element should help assign data from each content document ID to its corresponding content document link, so we can use them when we finally create the ContentDocumentLink records later.
Click the plus sign beside Source Data and choose a Resource. Then, select the Content Documents from the Get Records element we created earlier.

Next, click the plus sign again for your Source Data and select the Reimbursement Request ID resulting from your Create Reimbursement Request element.

Let’s move on to our Target Data next. Click the plus sign and select Record as the Data Type. Enable “Allow multiple values (collection)” and choose Content Document Link as the Object. Click “Create”.

It’s now time to map data! The goal is to make sure the ContentDocumentLink’s Content Document ID and Linked Entity ID are populated properly, with the former getting the attached file’s ID and the latter getting the Reimbursement Request’s ID.
To map, hover your mouse over the Source Data’s field so a round icon appears to the right of the field. Click that, then select a field from your Target Data column. The result should look like this:

Then it’s time to tell the flow to create our ContentDocumentLinks! Click the plus sign after your Transform element and select Create Records. Give it the usual label, API Name, and description, then select “multiple” under “How Many Records to Create”.
Under “Record Collection”, choose your collection variable resulting from the Transform element.

While our first fault path handles errors during the creation of the Reimbursement Request (our first Create Records element in the flow), it’s equally important to account for any issues that might occur during the creation of the ContentDocumentLink records (our second Create Records element) for your file uploads.
Although these failures don’t appear often, this ensures that users receive the same nice, informative error message if an error occurs during this step.
Like earlier, select Create Records element for ContentDocumentLinks and click “Add Fault Path”. Under “Fault”, click the plus sign and select “Connect to element”. This will allow you to connect this fault path to the same error screen we created earlier for the first fault path.
Change your Flow Builder view to Free-Form to get a more straightforward visual. You should now see that both your Create Records elements have a fault path that directs to the same screen.

We’re finally on our last flow element – another screen! Once everything’s through, we trust the flow that the Reimbursement Request has already been created and the file uploads are attached to the resulting record.
However, similar to what you experienced when we did our midway test earlier, the user would have to go and look for the created Reimbursement Record within Salesforce. This brings up the need to create a confirmation screen that assures the user with a direct link to the created Reimbursement Request record.
Go back into Auto-Layout view and click the plus sign below your last Create Records element. Select Screen, give it a label and API Name as usual, then hide the Header, Pause, and Previous buttons. On the left, search for “display” and drag the Display Text component onto your screen.
Give it an API Name and type the text you’d like to display for confirmation. I’m using “Your Reimbursement Request has been created. View it here.” Format it according to your preference. In my case, I’m merely centering it, increasing font size, and formatting in boldface.

I would like the word “here” to be a direct link to the created record. Since we would be needing the resulting Reimbursement Request record’s ID as text, let’s create a new variable. Click Done on your screen element for now and expand your toolbox using the icon on the upper left.
Click New Resource and select Variable as the Resource Type. Give it an API Name and description, then choose Text as the Data Type. Set the default value as the Reimbursement Request ID from your first Create Records element in the flow.

Take note of this variable’s API Name or copy it. Click Done and go back to your confirmation screen element. Back to your display text editor, highlight the word “here” and click the Link icon.

For the Link URL, type it in this format: /{!<insert your variable’s API Name here>}
Mine looks like this:

Click Save and Done to finalize your last screen. Make sure to take a good look at what your final flow looks like:

Nice! Make sure to Save and Activate it. It’s time for our final test.
Time for our final debug! Again, click the Debug button and run like we did previously. This time, fill out all fields on your screen component and upload some test files.
One thing to consider with the File Upload screen component is that if you’re uploading multiple files, you should select them all in one go. If you try to upload them one by one, they will only end up overwriting the previous upload, and you’ll end up having only your last file attached to the record. I learned this during testing. You know you’re on the right track when your file upload screen looks like this (peep the values I entered for the flow component on the left).

Hit Done on the File Upload screen and Next on our flow screen. The next screen should be our confirmation screen.

Test if your link works! Click “here” on the screen, and it should open a new tab on your browser leading to the created Reimbursement Request record.

Check the values: Are they the same as the ones you provided? Check the Files related list: Have all your receipts been uploaded? If you answered yes to both, congratulations! Your flow is working as expected.
You can go ahead and make minor changes if needed. In my case, I went ahead and changed the font color of the word “here” on my confirmation screen just to make it more obvious that it’s clickable.

Since this process is very common for TechSmart Inc.,I want to put this flow on the org’s home page so it’s easily accessible. Go into your org’s home page and click the gear icon on the upper right to select Edit Page. Search “flow” on the component bar on the left and drag it to where you want to place the screen on your home page.

Click Save, then return to the home page to confirm the new Screen Flow is visible and ready for use.

Screen Flows empower admins to design interactive, user-friendly experiences, enabling processes and guided data collection as well as seamless task execution. In this guide, we walked through building a Screen Flow that allows users to submit reimbursement requests with supporting documents already attached. With this approach, employees can submit reimbursement requests seamlessly without the extra step of attaching files later, improving accuracy and efficiency.
By taking advantage of file uploads within a flow, we made a simple process easier, ensuring that all necessary details and receipts are captured upfront. We also explored using loops and assignment elements to handle multiple files efficiently. Try implementing it in your own org and explore how you can further customize it to fit your company’s needs! Check out other Screen Flow components here.
What other kinds of Flow or use cases should we tackle next? Let us know in the comments!


